
Hi there! Today I thought I would quickly show you how to add the PINTEREST hover button to your images on your blog. Normally I am giving you pretty pictures and fun stuff, so click off here today if you're not into my geeky stuff. I needed a geek fix haha! I have been very …
Hi there! Today I thought I would quickly show you how to add the PINTEREST hover button to your images on your blog.
Normally I am giving you pretty pictures and fun stuff, so click off here today if you’re not into my geeky stuff. I needed a geek fix haha! I have been very busy creating tutorials over here, so I thought I should share at least one with you!
I’ll show you how to do it for a wordpress.org blog and a blogspot.com blog.

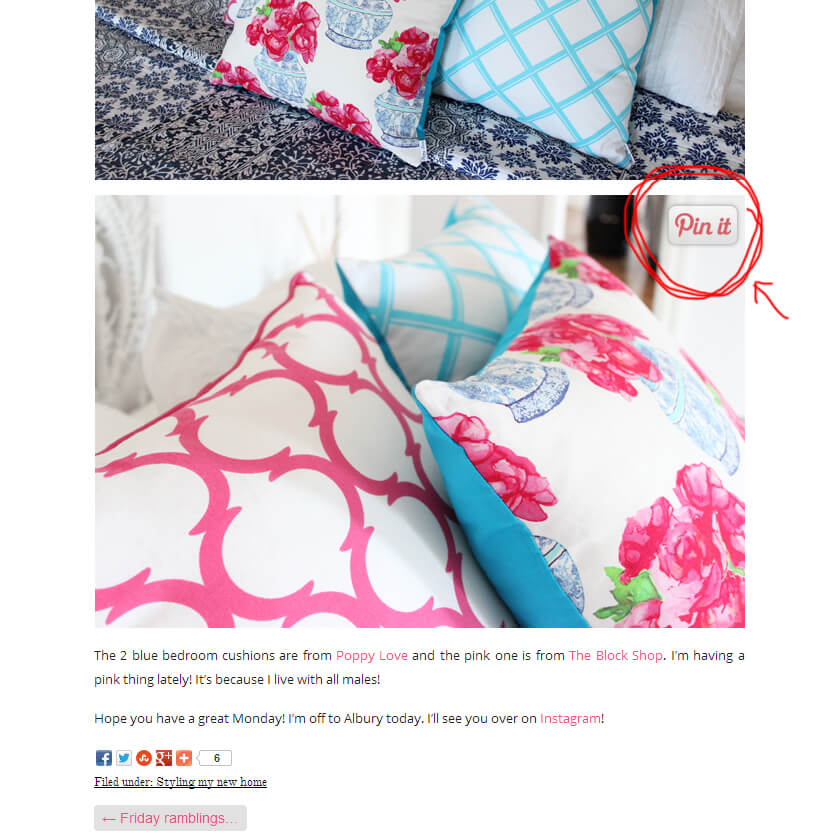
First, you need a cute Pinterest image (or you can use the standard one too!).
You can right click these images and save to your own hosting account (like photobucket or your own blog), or click on the actual image to grab the URL. I’ll show you more in the short video below.


Instructions for Blogspot.com Blog.
1. Grab this piece of code below.
{This is not my code, I borrowed it from HERE, so if you are having trouble grabbing the code, please visit Blogger Sentral to grab it from there}.
<script>
//<![CDATA[
var bs_pinButtonURL = "http://3.bp.blogspot.com/-y3xzTGiGzH0/UK4XOaUpdaI/AAAAAAAADw8/Z1MH4Jr4Efo/s1600/pinterestx1_72.png";
var bs_pinButtonPos = "center";
var bs_pinPrefix = "";
var bs_pinSuffix = "";
//]]>
</script>
<script src='http://ajax.googleapis.com/ajax/libs/jquery/1.8.2/jquery.min.js' type='text/javascript'></script>
<script id='bs_pinOnHover' src='http://greenlava-code.googlecode.com/svn/trunk/publicscripts/bs_pinOnHoverv1_min.js' type='text/javascript'>
// This Pinterest Hover Button is brought to you by bloggersentral.com.
// Visit http://www.bloggersentral.com/2012/11/pinterest-pin-it-button-on-image-hover.html for details.
// Feel free to use and share, but please keep this notice intact.
</script>
2. Go to your blogger template > Edit HTML
3. Find the </body> tag at the bottom of your template and insert the code ABOVE it.
4. To use your own button replace the code in RED with the url of your new button. Watch the video on how to find this.
5. To change the position of the button change the GREEN word to:
- topleft, topright
- bottomright, bottomleft
6. Save.
Instructions for a WordPress.org Blog.
This one is really simple because there is a plugin already built for you to use!
1. Visit Pinterest Pin it Button for images.
2. Download the plugin and install it on your blog.
3. Go to your Settings, find the Pinterest Pin it tab and set whatever you like in that page.
4. If you want a customised image for the WordPress.org blog, this is a little trickier. Watch the video below to see what needs to be changed (the image file and the sizing). If you find this hard to follow, the plugin still has a nice Pinterest image for you! {Note, I got the size a little wrong in the video and chopped my pin it button off a fraction, but it is easy fixed, just make sure you add the correct size when altering the file 🙂}
Happy Pinning! X


Comments
Mum E
Thank you so much Katrina. You are so generous in sharing these tips. I actually just started blogging this week and set up my blog with the help of your tutorials! I gave you a shout-out in my first blog post http://www.familyhomeblog.blogspot.com.au/2013/06/welcome-to-our-family-home.html
Anyway, my next task was to learn how to add the pin-it button to my images, so thank you!
Brenda Brown
YES! It worked!! Thank you!!!!
Karen
Thanks for the great tutorial! It was so easy to use!
sally
this was such a great tutorial! thanks a million 🙂
Even for a computer illiterate person like me x
Lee
Hi,
I have been wanting to add a Pin it button for ages and have just successfully done it. However I have the image that came with the html, I tried saving an image to photobucket but when I copied the html and replaced the image source in the template it wouldn’t work. I am not sure how I correctly find the code in photobucket. The other thing is it has placed a “pin it” on all my images, some may be copyrighted how do I remove images from certain images or when uploading more images how do i stop the button from showing on a specific image?
Would appreciate your help
🙂
Lee
Katrina
Hi Lee, just change the direct source for the image – not the full HTML link from phototucket. There is a specific way to add a no-pin to images and I found a good tutorial here for you: http://allshecooks.com/2013/02/12/how-to-add-a-pinterest-button-to-specific-image-2/
Susana Nicolau
Katrina! Thank you SOOO much for your tutorial!! I have been looking EVERYWHERE for someone to show other blogger how to add that icon!! Thank you so much! 🙂
Katrina
You’re welcome!
Jeanie
After looking at some very confusing tutorials, this one was refreshing simple to follow. Thank you, I’ve installed it and it worked a treat. High five!
Angie Olson
Yay, it worked! Thank you for your generosity!!!
Diana
Cute but when I added it to my blog the pin it button showed up below the pictures and over the text. I am not sure why but I followed the directions and watched the video twice.
Ana
Lovely tutorial and buttons, thank you for making this available 🙂
Courtney Curtis
Thanks for sharing! I just added this to my blog 🙂
Molly Minx
I just can't get anything to work for me. Has anyone been successful getting this to work on weebly?
Health Freedom Choice
Excellent information. Thanks.
Sinipellavainen
Thanks for the great tutorial 🙂 It was very easy to use! :))
Mary Miller
THANK YOU! I spent hours on that… and you just made it so easy to do. 🙂
Emily Margaret
Just added to my blog. It was so much easier than I thought! Thanks!
Maureen Esquillo Kao
thank you! this was awesome!
Melissa
Thanks Katrina! Just added 🙂
Kyi Lynn
Thank you for sharing this! You made it so easy to add it to my blog! Much appreciated! xo
zwergenluxus
Thanks for your tutorial. So easy and it works! 🙂